A journey on Video Streams and Bytes!
Table Of Contents

Until now, I’d never really had to deal with video streams and bytes, which meant I didn’t have to manipulate the video media itself. I’ve always relied on libraries or frameworks to do the job for me.
I have no media skills, and I am not a video expert.
But recently, I tried to build a video echo test application using WebRTC to get quality measurements on the video stream and then try to record that video from the server.
To do this, I used the node-datachannel library.
This article summarizes my findings and the possibilities offered by this technology if you adopt it and master the media processing.
So don’t expect to find a complete guide but rather a journey on how I tried to build this application and the difficulties I faced.
I would like to thank Paul-Louis Ageneau and Murat Doğan(https://github.com/murat-dogan) for their help and support while building this application. Paul-Louis is among others the author of the libdatachannel and Murat is behind the Node.js binding node-datachannel library.
Node-Datachannel: WebRTC in Node.js
I was searching for a way to build a (video) echo test application using WebRTC and Node.js and node-datachannel seemed to be the right choice.
This library is a Node.js bindings of the C/C++ libdatachannel library.
Staying on top of Node.js is more comfortable for me as I am familiar with this environment.
At first, I was looking for a way to initiate a data-channel connection between the browser and the server, as all I need to do is check that the connection is established and measure the RTT.
This is possible with node-datachannel as it supports the JSEP protocol RFC 8829 among others and is compatible with the browsers.
But as the library also supports the media transport, I can also use it to transport audio and video streams.
This means that I can use Node.js to build the server-side of my echo test application and have a client-server connection between the browser and the server to exchange the streams.
Creating the video echo-test application
The video echo-test application is a simple application that captures the video stream from the browser, sends it to the server, and the server sends it back to the browser. Finally, the browser displays the video stream again in a different HTML element.
To create the video echo test application, I needed the following:
A Node.js server to handle the signalization, then a peer-connection to handle the data-channel and the media transport.
A front-end application to capture the video stream and to send it to the server.
Call initialisation
The call flow is the following:
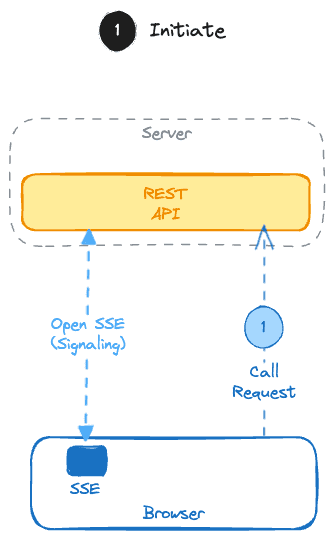
The browser calls the REST API of the server to initiate a persistent connection using the Server Side Events technology. This SSE channel is used to send messages back to the client at any time without the need for the client to poll the server.
The browser calls the REST API of the server to ask the server to initiate a new echo-test.

Note: Have a look here to see how to implement a persistent connection with SSE: GitHub - WebRTC-Signaling or to choose an alternative solution.
Negotiation
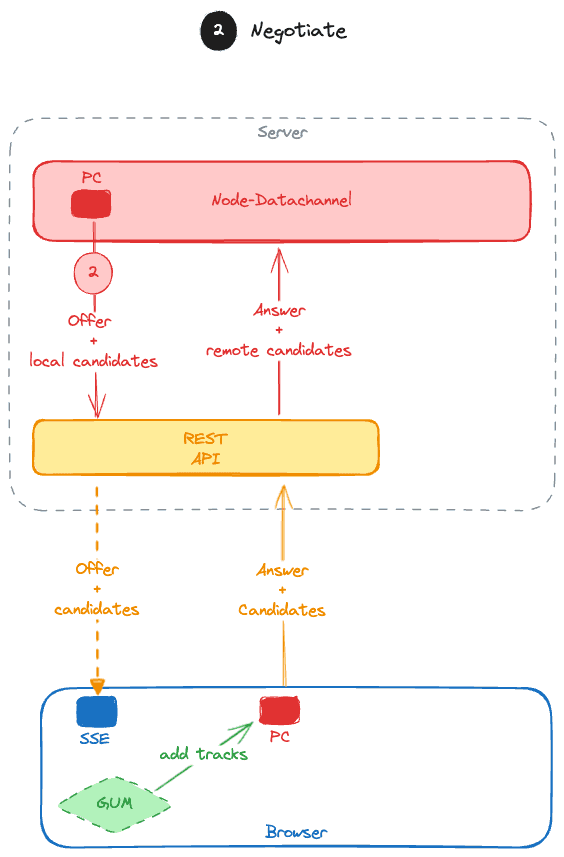
Once the server receives the request to initiate a new echo-test, it instantiates a new peer connection using node-datachannel and sends the offer and associated candidates to the browser.
export const createNewCall = (user) => {// create the peer connectionuser.pc = new nodeDataChannel.PeerConnection(user.id, {iceServers: ['stun:stun.l.google.com:19302']});// create the video tracklet video = new nodeDataChannel.Video('video', 'SendRecv');video.addH264Codec(98);user.pc.addTrack(video);// Create a datachanneluser.dc = user.pc.createDataChannel(user.id);// Send the offer and candidates to the browser using SSEuser.pc.onLocalDescription((sdp, type) => {user.sse.write('event: offer\n');user.sse.write(`data: ${JSON.stringify({type, sdp})}\n\n`);});user.pc.onLocalCandidate((candidate, mid) => {user.sse.write('event: candidate\n');user.sse.write(`data: ${JSON.stringify({candidate, mid})}\n\n`);});}
On the browser side, nothing special, the browser does the following steps:
- It creates a new peer-connection and sets the offer and the candidates received,
- It adds the local video track and generates the answer and the candidates to send back to the server,
- It sends the answer and the candidates to the server using the REST API
// Server-side. When receiving the answerexport const answer = (user, description) => {user.pc.setRemoteDescription(description.sdp, description.type);}// Server-side. When receiving a candidateexport const addCandidate = (user, msg) => {user.pc.addRemoteCandidate(msg.candidate, msg.sdpMid);}
This leads to the following call flow:

Note: I didn’t succeed to connect if there is only a media transport created. I had to create a data-channel too.
In call
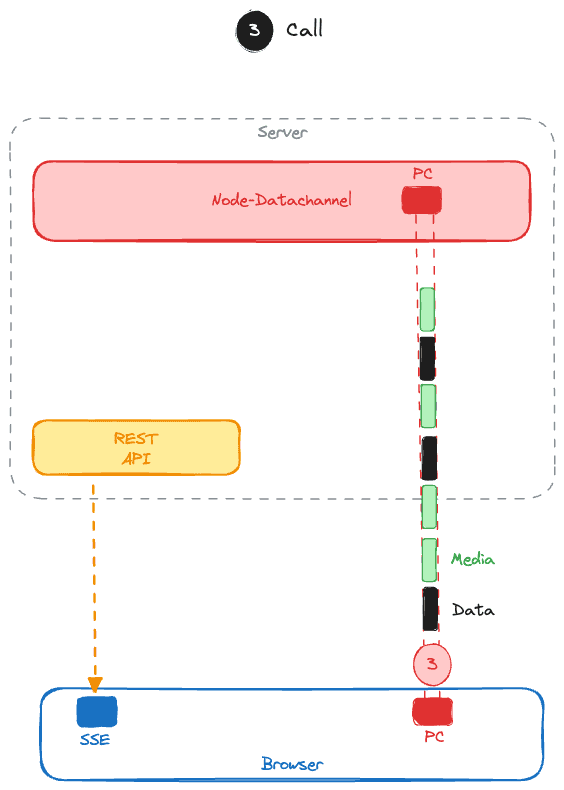
If the negotiation succeeds, the server and the browser are now in call.
The connection status can be checked through the ICE state or the connection state of the peer connection.
// Server-side. ICE state should be 'completed'user.pc.onIceStateChange((state) => {if (state === 'completed') {// connection is ok}});// Server-side. Connection state should be 'connected'user.pc.onStateChange((state) => {if (state === 'connected') {// connection is ok}});
Alternatively, the status of the media and data-channel transport can also be checked.
// Server-side. Data-channel is openuser.dc.onOpen(() => {// The data-channel has been opened successfully;});// Server-side. Video stream is flowingconst videoTrack = user.pc.addTrack(video);let sessionVideo = new nodeDataChannel.RtcpReceivingSession();videoTrack.setMediaHandler(sessionVideo);videoTrack.onOpen(() => {// Video track has been opened successfully});
The last step is to send the video stream received back to the browser. Here, I copied the RTP packets received.
trackVideo.onMessage((message) => {// Send the video stream back to the browsertrackVideo.sendMessageBinary(message);});
Nothing to do more. On the browser side, a new video track should be received and can be displayed.
// Browser-side. When receiving the video streampc.onTrack((track) => {remoteVideo.srcObject = track.streams[0];});

Measures
Now that the connection is established, I can measure the RTT and the packet loss:
From the server side: Node-datachannel provides the RTT and the traffic exchanged on the data-channel. But these stats are not available for the media transport. I’m discussing this point with the author of the library to be sure this is not a problem with my implementation.
From the browser, I used my Webrtc-metrics library to get the media stats from the browser directly.
At this time, my echo-test application works, but the quality displayed is not at the expected level. It is like the video stream is limited to 300 kbits/s even if the server runs locally (zero latency), but the statistics still seem to point a bandwidth limitation…
While playing with node_datachannel, I found this application based on WebRTC DataChannel and that allows to test your connection against packets lost Packet Loss Test. I updated my sample to do some tests on my own by using an unreliable datachannel and I was surprised to easily have some packets lost when sending binary data over the channel and through my Turn server.
Recording the video stream
The next step is to record the video stream on the server-side.
This is where I’ve found my current limit as I have no real skills in manipulating video streams and bytes.
So far, except for replacing the background of a video stream, I’ve never had to manipulate the video stream itself.
And I have to admit that I am a bit lost in the jungle of video codecs, containers, and formats.
So this part is still a work in progress. I’m sharing what I’ve done so far. It would take me much longer to understand and be able to finalize it.
Using the Stream API
The first thing I tried was to use the Stream API to get all the packets and save those parts to a file.
But just because you have H264 or VP8 RTP packets doesn’t mean you can write them directly to a file. In fact, you can; but you will not be able to play back that video file because the data isn’t properly encoded and encapsulated in a container.
However, using the Stream API is a good way of getting the data and manipulating it, as you can access to a large amount of data without having to load the whole thing into memory at once.
// Server-sideconst videoStream = new Readable({read() {}});const parseRtpHeader = (msg) => {let version = (msg[0] >> 6);let padding = (msg[0] & 0x20) !== 0;let extension = (msg[0] & 0x10) !== 0;let csrcCount = msg[0] & 0x0F;let marker = (msg[1] & 0x80) !== 0;let payloadType = msg[1] & 0x7F;let sequenceNumber = msg.readUInt16BE(2);let timestamp = msg.readUInt32BE(4);let ssrc = msg.readUInt32BE(8);let csrcs = [];for (let i = 0; i < csrcCount; i++) {csrcs.push(msg.readUInt32BE(12 + 4 * i));}return {version,padding,extension,csrcCount,marker,payloadType,sequenceNumber,timestamp,ssrc,csrcs,length: 12 + 4 * csrcCount};};const videoWritableStream = fs.createWriteStream(filePath);// Server-side. When receiving the video streamtrackVideo.onMessage((message) => {const header = parseRtpHeader(message);const H264Payload = message.slice(header.length);videoStream.push(H264Payload);});// If you need to deal with data on the roadvideoStream.on('data', (chunk) => {// Write to the file using the writable streamvideoWritableStream.write(chunk);});videoStream.on('end', () => {// do something when the stream endsvideoWritableStream.end();videoWritableStream.on('finish', () => {console.log(`Video saved to ${filePath}`);})});
Here there is not really a need to use the Stream API as the video stream is already a stream. That’s said, I think I succeeded in accessing the H264 payload.
But extracting the H264 payload is only the first step to save the video stream to a playable format, then, you need to depacketize, deal with NAL unit… and then to encode the video stream to a container format like MP4 or WebM.
I tried with fluent-ffmpeg to help me doing this pipeline but I never succeeded to have a valid video file. My file was always empty. Maybe I missed something.
ffmpeg().input(videoStream).inputFormat('h264').output(videoWritableStream).outputFormat('mp4').on('end', () => {console.log('Video saved');});
Note: Chrome 124 will introduce the WebSocketStream API
Using GStreamer
The second thing I tried was to use GStreamer to record the video stream.
So to do this, I will create a UDP socket and send the video stream to a specific port.
// Server-sideimport dgram from "dgram";const udpSocket = dgram.createSocket('udp4');trackVideo.onMessage((message) => {udpSocket.send(message, 5000, "127.0.0.1", (err) => {if (err) {console.error(err);}});});
Then I will use GStreamer to receive the video stream and to record it to a file.
$ gst-launch-1.0 -e udpsrc address=127.0.0.1 port=5000 caps="application/x-rtp" ! queue ! rtph264depay ! h264parse ! mp4mux ! filesink location=./video.mp4
This time it worked nice. I was able to record the video stream to a file and then to play it back (Thanks Murat for the command 😅).
But here, as you’ve seen, all the job is done by the GStreamer pipeline. I just have to send the video RTP packets to the UDP socket.
Using Node native module
The last thing I tried was to use the Node native module to record the video stream.
So instead of launching GStreamer from the command line, I tried to use it from the Node.js application directly.
Remember, I never wrote C++ code nor a native module for Node.js.
But I tried to see how to do it.
For that, I needed:
A C++ file that implements the Node-API to create the native module and exports the function accessible from the JavaScript code. This part should load the GStreamer library and create the pipeline to record the video stream.
A binding.gyp file to compile the C++ file to a shared library.
A modification in my package.json to compile the library when doing a
npm install.
I succeeded to write a module that launches a GStreamer pipeline but not the one I expected…
In fact, I faced two problems:
First, the GStreamer pipeline was running on the main thread so it blocks the Node.js event loop.
Second, I need to store a handler to be able to stop the pipeline when needed.
I found this great documentation around Node-API and that proposes solutions to my problems.
But I will have to spend more time to understand how to do it but it shows me how to write native modules.
Conclusion
It’s not easy to understand how to process video streams and bytes. It requires a good knowledge of media and codecs.
As WebRTC offers more and more possibilities for developers to manipulate media, it can be good to understand this part better. I hope to see new libraries and tools for the Node.js ecosystem.
Even if you’re not working on creating a new codec or optimizing video, you may still need to manipulate the video stream, for example, to capture the video from an IP camera and to display it in your WebRTC application.
On this journey, I discovered many things that I may need to understand better in the future.
The last thing concerns libdatachannel and node-datachannel: I found that the library is very powerful and offers a lot of possibilities from Node.js.
I hope they will continue to grow and be more and more used in the future.

